Monday, January 30, 2012

{maurices giveaway winner!}

Thanks so much to everyone that entered the maurices giveaway! 150 comments...wow! And I reached 100 fans on my new Facebook page so the lucky winner will also receive two cute sets of handmade Valentine notecards.

I used random.org to pick the winner and the lucky gal is...

Jessica 8:21 PM  
I Follow you on Pinterest jessicarwarfield at gmail dot com 

Congratulations Jessica! Email me at *mandybeth01 at hotmail dot com* with your mailing address so I can send you your goodies!

post signature

Monday, January 23, 2012

{maurices giveaway 2.0}

Yep...you read that right friends.

Are you ready for another maurices giveaway??!!

The lovely and generous folks at maurices asked me if I would share some exciting news with you, and in return they have given me another $50 giftcard to give to one lucky This Girl's Life reader!

So what is maurices up to?

They are smack dab in the middle of their next Main Street Model Search!


They are looking for real girls in all sizes who embody what maurices is all about: fashion, fun and giving back. If that's you, you can enter the contest to be one of 12 women chosen to be a maurices Main Street Model. You could win fabulous prizes, including a fashion shoot in an iconic destination in the U.S., a $1,500 maurices giftcard, and $7.500 for a charitable makeover to be awarded directly to a community or charitable organization in your hometown. <---- this is my favorite part!

Here is a video featuring some of last year's beautiful and inspiring winners and how they have given back to their communities...


So do you think you have what it takes to be one of the next maurices Main Street Models? Be sure to enter soon...the deadline is noon (MST) on February 13th. You can enter here!

And now for the giveaway! 

One lucky reader will win a $50 maurices giftcard, AND if I reach 100 Facebook fans, I'm going to throw in two really cute sets of handmade Valentine cards created by yours truly! Here is a little peek at one of the cards...


To enter to win, you can do one or all of the following, but be sure to leave a comment for each one:

1. Tell me what you would do with $7,500 if you could give it to a local non profit organization
2. Follow This Girl's Life {already a follower? Be sure to leave a comment letting me know!}
3. Like This Girl's Life on Facebook 
4. Follow me on Pinterest
5. Like maurices on Facebook 

6. Share this post on Facebook, Twitter, or your own blog {leave a separate comment for each}

Giveaway will be open until midnight EST Sunday, January 29th. Winner will be chosen randomly. Open only to US residents. 

Good luck friends!

*maurices also provided me with a $50 giftcard for sharing their Main Street Model Search on This Girl's Life. Thanks maurices!
 
post signature

Saturday, January 21, 2012

{DIY Earring Stand}

For the past few months, I've been on the hunt for a stand/organizer for my stud earrings. Last year I shared my DIY jewelry organizer that holds my hanging earrings, as well as my rings and favorite necklaces. But that project didn't solve the storage solution for my stud earrings that I wear fairly often.

Then I came across this idea on Pinterest...


And a crafty lightbulb went off!

The last time we went to IKEA, I purchased this $1 picture frame...


because it was 1. cute and 2. only $1. But since then I hadn't found a spot for it.

Until that little crafty lightbulb went off in my head. So I gathered my supplies which included the frame, my cropodile, and a pen...

This is where I have to apologize for the low quality pics...all I had on hand when this crafty genius moment hit me was my cell phone. :)

The frame came with two pieces of plastic inside, both of which were covered in a thin plastic film. The film made it very easy to mark off the plastic without leaving permanent marks. While the plastic was still in the frame, I traced around the inside of the frame onto the plastic. I then marked off one inch increments onto one side...


I then drew lines across...


And then used my cropodile to punch my holes {I eyeballed them because I'm lazy like that...I know they aren't totally even and I'm OK with that}


The only bummer is that my cropodile wouldn't reach into the center of the frame, but if I want to later on, I could use a small drill bit to make more holes.

And then for the fun part! I put the plastic back into the frame, added my earrings, and voila!


I can't tell you how much I am in love with this little piece of earring holding goodness. And I even have one more set of holes for some yet to be purchased earrings...


So with some Pinterest inspiration, $1 frame, and about 10 minutes, I created the perfect and simple solution to store my earrings. 

Low cost + big impact = my kind of DIY project. :)


Linking up with...

DIY Club

The Southern Institute


Confessions of a Stay At Home Mommy
IHeart Organizing


post signature

Friday, January 20, 2012

{mail storage solutions}

We are in desperate need of a storage solution for our mail and paperwork at our house. Please tell me we aren't the only ones that have this problem. Mail on the kitchen counter...the island...the desk...in my purse. It is out.of.control.

One of the problems with our house is that it is a split level, so you come in on the bottom floor but the bulk of our living space is upstairs. So I'm not sure where to keep our mail. Now that our office area is going to be in the rec room on the first level I think it will make more sense to hang something in the entryway, so it is convenient to drop things off when I come home, but I would also have our bills and paperwork close by to remember to file and pay things when needed.

Here are a few ideas I've pinned to cure our mail conundrum. This first is my favorite but I can't seem to find where to buy it...

Source: bhg.com via Mandy on Pinterest


Source: amazon.com via Mandy on Pinterest


How do you organize your mail and paperwork? I would loooove some help here!

post signature

Wednesday, January 18, 2012

{not so DIY starburst mirror}

With all of the great DIY starburst mirrors floating around the blog world and Pinterest these days, I had to poke a little fun at myself with the title of this post. I mentioned here how I was debating over  DIY or buy in order to get my very own starburst mirror.

If you follow me on Facebook, you saw that I finally decided to splurge and buy the one I had been stalking at Hobby Lobby. It was half off, but still $40, which is a huge splurge for me on one home decor item.

But it is now hanging in our dining room...


And it was worth every single penny.


It makes me smile every time I see it. {picture this wall with white trim and beige walls for the full effect}

And yes...I did have to change up my little vignette to make it work...


I removed the chalkboard and hung the canvas on the wall to fill in the gap. Sadly our oddly placed heating control is now showing, but I'm OK with that.

I think the chalk board will go in our entryway...which will be a nice pop of color after the walls get painted. And now I'm really tempted to paint our entryway table top with chalkboard paint thanks to Emily at 52 Mantles...


What do you think? This is the table...


Chalkboard top and white legs? The walls will hopefully be gray soon. I loooove gray + turquoise right now so I think the chalkboard would be the perfect accent.

OK...so I went from my not so DIY mirror to redecorating my entryway. I'm all over the place. :) And you love me for it, right?

Linking up with...


Aisle to Aloha


post signature

Monday, January 16, 2012

{new facebook page!}

Notice anything different around here?

I did a little sprucing up to the blog. A little makeover if you will.

And I added fun new buttons. See them over there? ----------------->

There are easy links to my Etsy shop. my Pinterest and the one I'm most excited about...

The new This Girl's Life Facebook page!


Be sure to head on over and become a fan! I'll be sharing fun extras including that won't be on the blog like links to great products, other fun blogs and linky parties and I'm sure there will be a giveaway in the future. :)

post signature

Friday, January 13, 2012

{Olympic ColorClix}

I'm not one that is obsessed with apps for my phone, but when I discovered Olympic's ColorClix the other day, I think I squealed out loud. For anyone that loves color, home design, and the ridiculous instant gratification that smart phones offer, you will be instantly in love with this app.

Let me show you what this little gem of an app does...

First, I took one of my favorite photos that I had taken with my phone {this is a spot on our neighborhood road that I love}...


and loaded it into the ColorClix app. And then I was instantly given this...


Pretty sweet huh? The first thing ColorClix gives you is a selection of the main colors in the image, with the corresponding Olympic paint color names.

Then, if you touch on a part of the photo, it gives you that color and matching shades...


You can also get a mix of the complementary colors...


I could honestly play with this app for HOURS. And if that wasn't fun enough, the really awesome feature is that you can take a photo anywhere with your phone and load it right into the app to find matching paint colors.

So say you are out shopping and see the perfect piece of art or pillow that inspires you to paint a room in your home. Take a photo of it, load it into ColorClix, and get an instant list of colors to choose from.

Now I just need about 10 gallons of paint to accomplish my 2012 home goals and I'll be all set! Let me know if you try this out and what you think...I bet you'll be hooked too!


*This post is in no way sponsored by Olympic or ColorClix...I just really love this app!

post signature


Thursday, January 12, 2012

{whoa! and low}

I've seen other blogs feature similar items, whether they be home decor or fashion, that are on the high and low end of the budget spectrum. I don't know if this will become a regular feature on This Girl's Life, but I had to share these whoa! and low finds with you...


Kate Spade New York All Aboard Necklace...$248

maurices 5 Stone Bib Necklace...$25

And honestly I like the low necklace much better! What about you?

post signature

Wednesday, January 11, 2012

{2012 home goals}

Following along with my one little word for 2012, commit, and being inspired by The Nester's 2012 Home Goals blog party, I've decided to make a list {a rather lofty one} of the projects I would like to accomplish around our house this year.

Before I go into each one separately, here is the complete list...

Told you it was lofty! :)

Do I expect us to complete all of them? Not realistically. But do I think it is doable in a year? Totally. A lot of these projects can be completed in a weekend {minus the kitchen renovation}. I just have to commit to completing them!

We've been living in a house that just isn't ours for over two years now and my hubby and I are more than ready to remedy that this year. A lot of these projects involve a simple coat of paint, which is inexpensive and fairly quick, especially if you have family members to bribe with pizza recruit to help.

So let's break down each one a bit shall we...


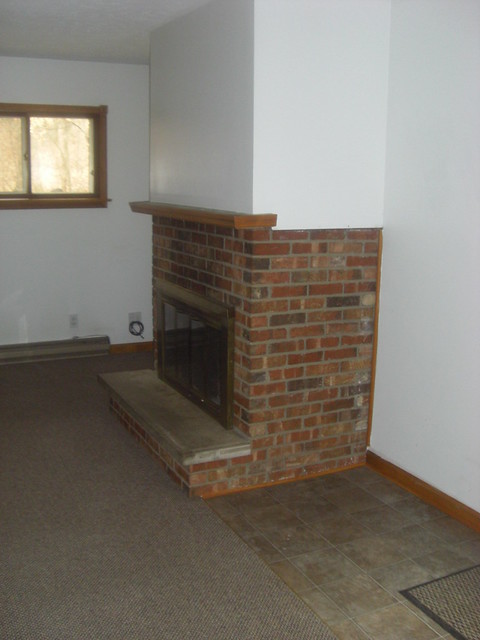
I've talked about this one quite a bit on the blog. It is an eyesore that I know can be beautiful with a little bit of paint and some wood to beef up the mantel. When we moved in it looked like this...


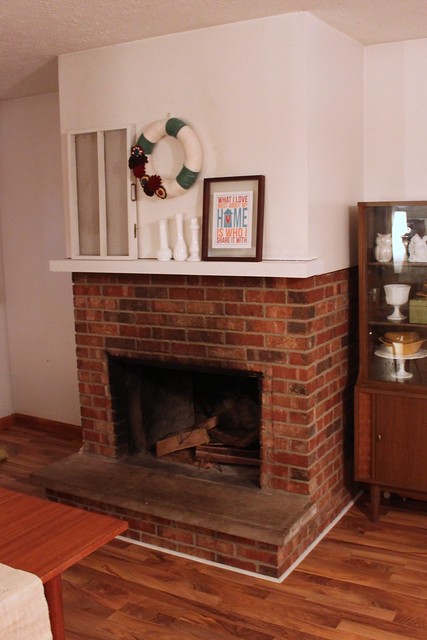
So far we've replaced the flooring, painted the concrete mantel white and removed the fireplace doors which was a good start. Here it is in its current state...


Next up is a scary coat of white paint on the brick {someone hold me and tell me it will look fabulous} and some sort of constructed cover for the skimpy and uneven concrete mantel.

Here are a few fireplaces that are inspiring me...


I know it can be a showstopper if I just stop procrastinating and jump into this project. And going right along with the fireplace is...


White and dingy walls + ugly stained woodwork = not a happy dining room {see above pic of our fireplace}. This one is pretty self explanatory.

The trim will definitely be going white. Not sure yet on the walls, but it will be something on the neutral side. A bit of inspiration for these walls...


When we moved into the house, Landons' entire room, including most of the trim, was smurf blue.


Seriously. I didn't photoshop that...they painted EVERYTHING blue.

I painted his room the same shade of brown as the boys' first nursery before we moved in, but neglected the closet, which is a really awful shade of royal blue...


We took the doors off when we got the carpet installed, Which cued my instant obsession with painting over those awful blue walls. My plan is to leave the doors off, paint the inside a lighter color, add some shelving and organize the heck out of it. And maybe add a reading nook.

A bit of inspiration for Landon's closet...


Source: google.com via Mandy on Pinterest


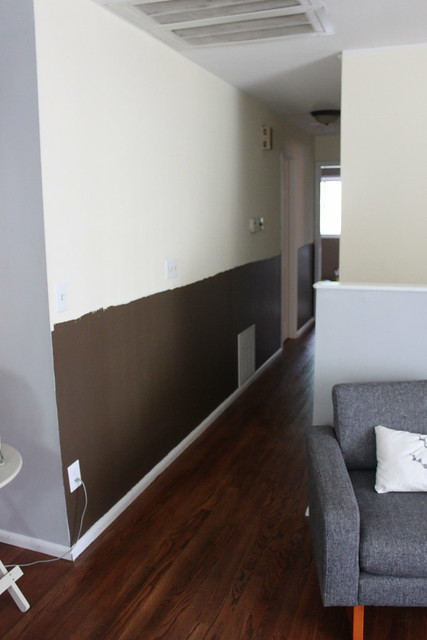
I was so excited a few months back to paint our hallway. When we moved in it was two toned with a chair rail. I took this photo minus the chair rail before I started painting...


And I finally got around to painting it gray to match our family room. Before I did the trim it looked sooo much better...


And then procrastinator me waiting too long to do the trim, and the little bit of paint I had left thickened up. No problem I thought...tt will be fine.

And then it dried like this...


I wasn't going for the spotted leopard look.

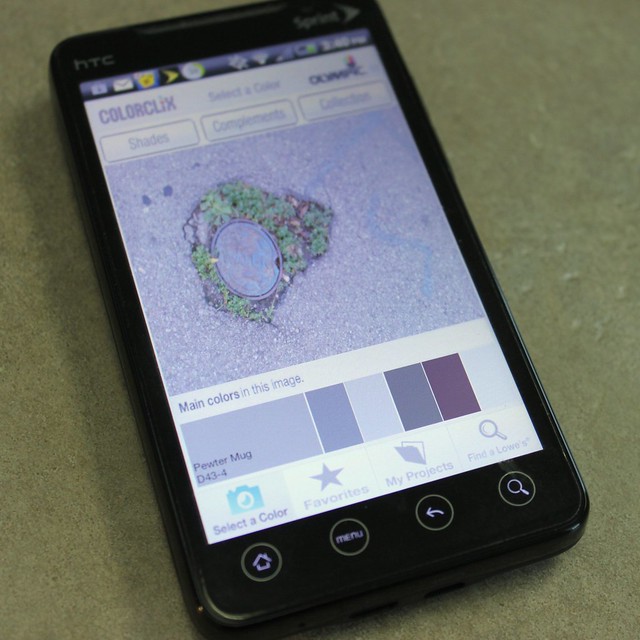
So we need to repaint the hall. BUMMER. Thank goodness I have the numbers to color match the paint.

And while we're at it...the stairwell needs to get a coat of the same lovely gray. This will require a ladder on the stairs which I'm definitely not going to attempt. Anyone game? I'll get you your very own pizza!

And now heading downstairs...


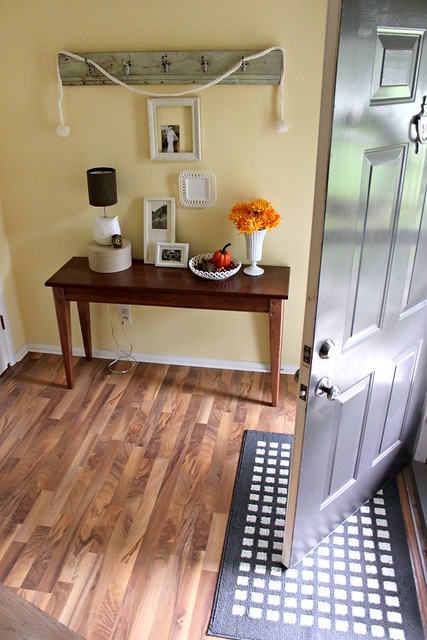
I have never been a fan of yellow walls, so when we bought the house, I knew that the entryway would have to change asap. Two years later and it is still yellow.


I'm thinking of a darker gray for this space with a white table and other light/bright accents. Here are a few photos that are inspiring me...


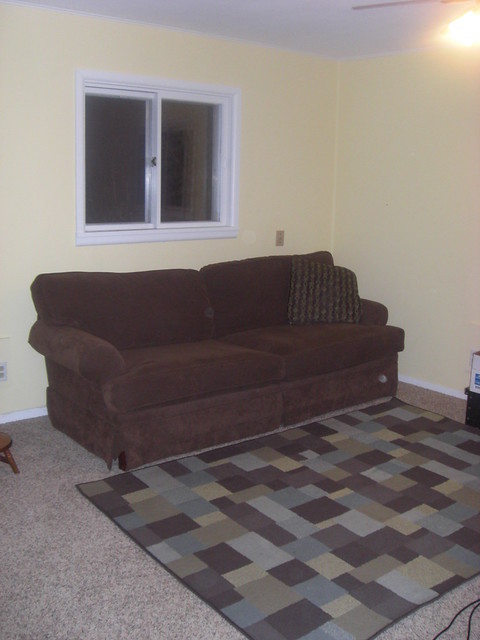
Ahhh the rec room. Haven't really shared much about this space with you all {if any at all now that I think about it!} It is a really great extra room on the first floor of our house that we're slowly turning into a play room/office.

And guess what? Its yellow too! {duh duh duhhhh}


We have our spare couch and TV on one side, and the other side houses our treadmill and miscellaneous stuff for now. The plan is to divide the room with a large IKEA Expedit bookcase and add a desk, which would move our office space down there from where it currently is in our family room. This photo shows a similar concept...


The Expedit will give us a TON of storage, which is a good thing because the plan is to move my scrapbooking and crafting supplies down there. The hubby is bit scared about that one. I think I might have to do a little bit of supply purging.

The room also needs a fresh coat of paint. I think that the ever popular "silver sage" paint color would look great in there. Here is a sample of it in my friend Beth's home...


Lots of work to do in there but I'm excited to make it a fun and functional space for the whole family!


Tiny space + bright yellow walls + outdated vanity = help!!


At least it is a small space and painting will be a quick job. This photo has me inspired for this space...


Fresh, light walls and a gray vanity. Eventually we want to turn this into a full bath, so we won't be putting much money into this space for now. 


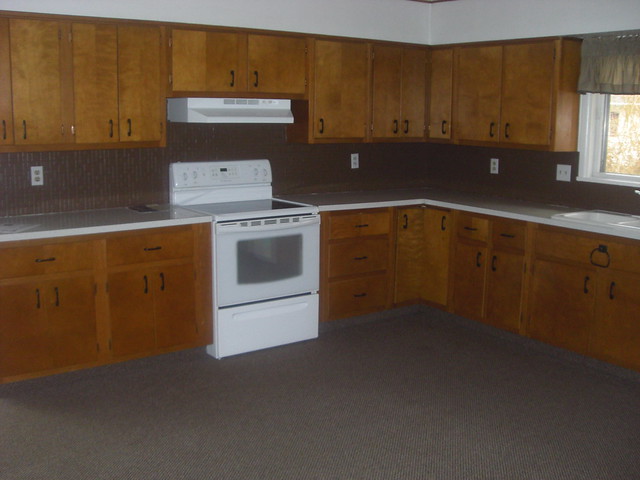
And of course I left the most monstrous project for last. Our kitchen.

Here it is in all its glory when we moved in, carpet and all...


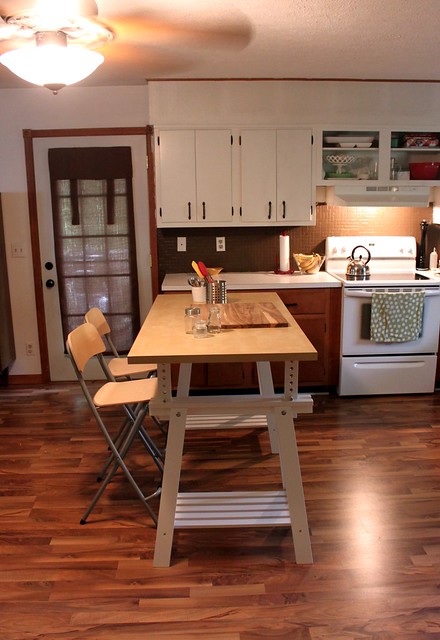
We've since replaced the flooring with laminate, painted the upper cabinets white and added a DIY island...


And now we've decided that it just needs to be gutted. No more 70's falling apart cabinets, gold speckled counter, dingy white sink, painted tile backsplash. It all has.to.go.

But of course we are going to be doing this on a very small budget, so we will probably be tackling it in stages. The bottom will most likely be first so we can replace the sink, faucet, counter and non-functioning dishwasher. As for the top, we hope to remove the soffet and replace some of the upper cabinets with open shelving, both for the aesthetic appeal and also to save some money.

We will almost definitely be going the IKEA route with this renovation. We know we want to get the same farmhouse sink we had in our old kitchen and butcher block counters. Here are a few inspiration photos I've pinned...


Whew! Are you still with me?

If so, congrats, because I think this was the most involved blog post on This Girl's Life to date.

Now your mission is to stick with me through 2012 to see how many of these goals we can accomplish.

Are you in?

post signature

LinkWithin

Related Posts Plugin for WordPress, Blogger...